Materials Needed :
- wooden cigar box
- clock components
- gold drawer pull and screws (you will need shorter screws than the ones that come with the pull)
- brass metal corners, 4
 black number stickers
- wooden plugs for legs, 4
- black acrylic paint
- découpage medium
- craft glue
- shape cutter (or scissors)
- large circles template
- cutting mat
- acrylic ruler
- pencil
- ¾" (19mm) wash brush
- no.10 shader brush
- drill
- small screwdriver
Paper Palette
 About the papers
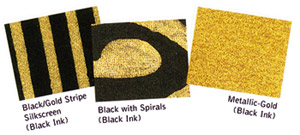
The gold spirals and the black/gold stripe are Indian woodblock papers. The background paper is handmade and the design is hand-pressed onto the background with a carved wooden block.
1. Remove the Hardware
Remove the hinges and closure components from both ends of the box.

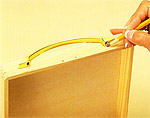
2. Mark the Hole Locations
Set the drawer pull on top of the wider half of the box. Center the handle and then lay it on its side. Mark the location for drilling the holes with a pencil.
3. Adhere the Legs
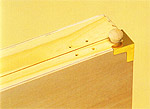
Use a metal corner as a placement guide for the front two legs, and glue each of the four legs onto the bottom of the box.
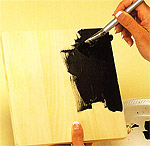
4. Paint the Box
Paint both the box halves, inside and out, with black acrylic paint using the no.10 shader brush. Let the paint dry.
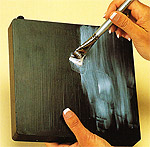
5. Apply Découpage Medium
Cover the box halves with découpage medium, using the ¾" (19mm) wash brush. This will protect the paint. Set aside to dry.
6. Cut Out the Shapes
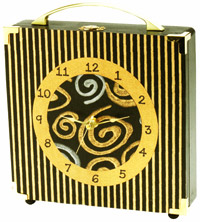
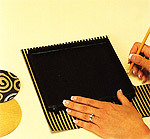
Use the 6" (15cm) circle template and the Shape Cutter to cut a circle from the gold paper. With 4½" (11cm) circle template, cut a circle from the Black with Spirals paper. Trace around the front half of the box with a pencil, onto the black and gold striped paper. But sure the lines are vertical and square with the box. Cut out this shape.
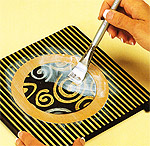
7. Adhere the Paper Shapes
Cover the front of the box with découpage medium using the ¾" (19mm) wash brush. Lay the striped paper on the front of the box so that all the edges are aligned. Smooth out the paper working from the center to the outside edges. Apply another coat of découpage medium over the entire surface of the striped paper. Lay the gold circle i8n the center of the box and press it smooth. Cover the gold circle with découpage medium and lay the smaller circle in the center. Smooth out that circle and apply a coat of découpage medium over the entire surface of the box. Allow it to dry completely.
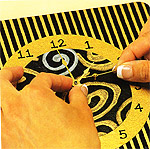
8. Add the Clock Numbers
Cut another 4½" (11cm) circle from a piece of scrap paper. Fold it into eighths. Cut a small hole in the center of the circle. Place the circle on top of the spiral circle. Mark the center of the circle on the box. Drill a hole in the center at this mark with a 5/16" (8mm) bit. Set the scrap paper back on the swirl circle and use the fold lines as a guide for placing the self-adhesive number. Start with the 12, 6, 3 and 9. Place the other numbers evenly between the other fold lines.

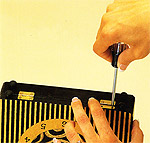
9. Add the Clock Components
Push the clock shaft through the hole in the box from back to front. Add the washer, hex nut and hands to the shaft.
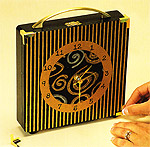
10. Reattach the Hardware
Reattach the hinges and closure components to the box. Add the drawer pull the top of the box.
11. Add the Metal Hardware
Attach the metal corners to the front of the box with craft glue.
 Ram Navami
 Passover
 Good Morning