Decoupage is an astonishing French name for the craft of adorning a surface with illustrations cut from paper. However, the technique of making this craft is not very difficult. Printed pictures are aptly cut out with scissor after choosing the pictures according to your requirements. The papers which are cut in required shapes are stuck down on the surface to be decorated. Let the glue dry. Then give at least three coats of varnish on the adorned surface. Decoupage is as easy as it sounds. It looks like it has been hand painted if sticking, cutting and varnishing are done wisely and appropriately. It's a really good craft for Thanksgiving. Collect pictures of fruits, flowers, birds, bees, nuts and butterflies from magazines. A small wooden container can be decorated agreeably. Work properly on this fantastic Thanksgiving project.
TOOLS AND MATERIALS
You need:
Materials
- A small wooden box for decoration. You can use a plastic box as well.
- Small Thanksgiving pictures: fruits, flowers etc.
- Small scissors
- A plate
- PVA glue
- Water container
- One small and one medium paint brushes
- Colored felt tip pens- One pack
- One tin of clear varnish
CAUTIONS AND ADULT HELP
Use the scissors wisely to complete this project appropriately. If you want to work in a small group then decoupage is a really good project to work on. Work with your family and friends to have lot of fun. Help each other and find suitable and appropriate pictures for the project.
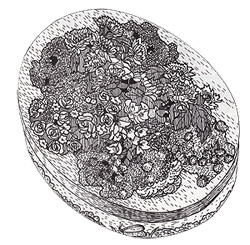
Figure - 1
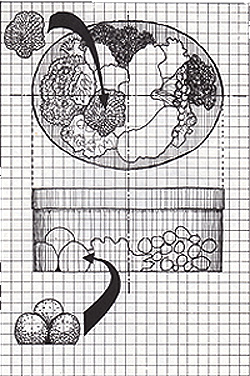
Figure - 2
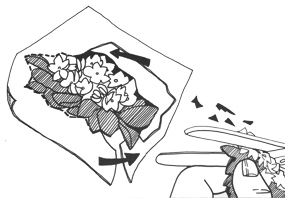
Figure - 3
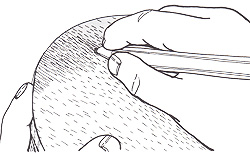
Figure - 4
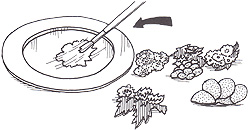
Figure - 5

Figure - 6
WHAT TO DO
- Take a look at the project picture (fig. 1) and the working drawings (fig. 2) and understand how the small wooden oval shaped box is decorated with the pictures that are taken from the magazines. It is notable that the pictures of flowers and fruits are of same size and scale. See carefully how the top edge of the box and the lid rim have been colored with felt tips. However, this is kept undecorated.
- Sit back with magazines and scissors. Chose pictures wisely and cut the individual flowers and motifs. Separate them from their backgrounds. Swiftly cut away the large areas of waste and the next step is to cut into the design from the edge (fig. 3).
- Hold the paper and scissors at both of your hands while cutting. Then place the paper into the scissors.
- Be ready with all the tools and materials. Set the pictures on the work surface (face up).
- Some parts of the box should be left undecorated. Use the left tip pens to color these parts (fig. 4).
- Know the whereabouts on the box before placing the cutouts, place them face-down on the plate, and brush them over with a mixture of PVA glue and water (fig. 5).
- Wait for sometime till the paper is stretched, then place the prints, one at a time, at the appropriate position on the box. Make it smooth and brush the surplus glue over the box (fig. 6).
- Continue the process of gluing, placing and overlapping the picture cutouts to decorate the areas of your choice with a mass of color and pattern. Set the box aside to dry.
- After making the decoupage crisp and dry, use the brush and lay on three coats (at least) of clear varnish.
TIPS AND OTHER IDEAS
- Use one color over the surface, then apply next color and repeat the process. Use all the palette colors.
- It is prudent to use water-based PVA type glue. It soaks well into the print and it helps you to stretch the paper.
Warning: This is not a project where you can use resin or rubber base adhesive.
- If you have brushed the glue over the entire surface then give it sufficient time to dry.
- The varnish which is used between the coats should be dried as well. Work with varnish in a warm, dust free and dry room.
More Crafts:
Indian Selections | General
 Mother's Day
 Passover
 Good Morning