Besides being a wonderful symbol, THE STAR OF DAVID, is known to be a singular and extraordinary piece of geometry as well. The six-pointed star is formed from two indistinguishable equilateral triangles and this can be understood aptly if you take a good look at the entire design structure once. You have the provision of drawing the design using a compass. You would have a fair idea about how the star fits inside a circle once you gaze at the design structure properly.
Take out your compass to draw out a circle and then step off radius arcs around the circle. Now, it's time to number the points in a clockwise direction, in the sequence of 0,1,2,3,4,5 and back again to 0, and then make use of a pencil and ruler to join up points 1-3, 3-5, 5-1, 0-2, 2-4 and last but not the least, 4-0. Now you are right on the edge of drawing a perfect Star of David. Truly it will turn out to be a perfectly planned striking piece of design. Continue to enjoy the fun time!!
If you are an enthusiastic Hanukkah celebrant and take the pleasure in playing around with a ruler and compass, then you are on the right track to celebrate the festivity with lot of fun and laughter.
TOOLS AND MATERIALS
- 5 ½ * 5 ½ inches thin white cardboard- 4 pieces.
- A pack of colored felt tip pens.
- Quick-set paper adhesive- A small amount. (Best if it's in a easy to use “lipstick” tape container.
- 12 inches fancy yarn- collect gold embroidery thread as it is apt for the craft.
- A pencil
- A ruler
- One or a pair of compasses.
- Scissors.
CAUTIONS AND ADULT HELP
- Practice makes a man perfect. So, don't forget to draw different patterns with a compass on a scrap paper.
- Cut out as many circles as you can with your scissors. Don't ever move the scissors towards the paper instead keep the paper moving with the intention that the scissors blades are always being fed with the line of the next cut.
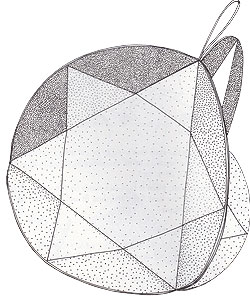
Figure-01
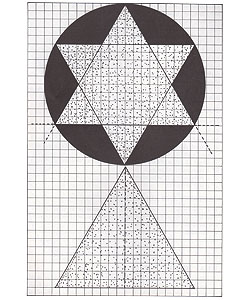
Figure-02
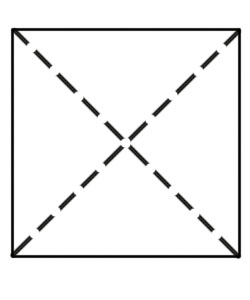
Figure 03
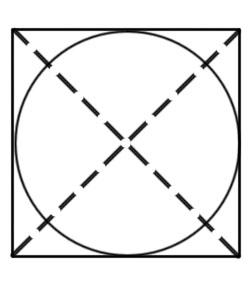
Figure 04
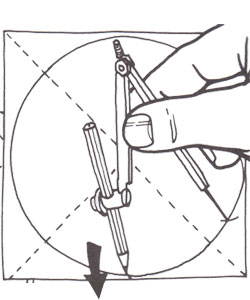
Figure 05

Figure 06
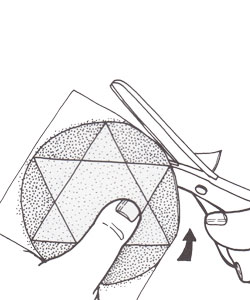
Figure 06
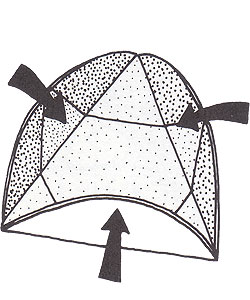
Figure 08
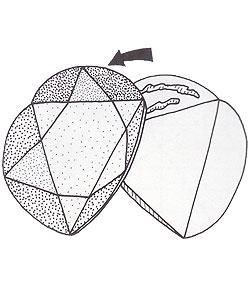
Figure 09
Figure 10
WHAT TO DO
- Study the entire project picture (fig. 01) and also the working drawing patterns (fig. 02). Take the four squares of the thin cardboard. Make good use of the pencil and ruler to sketch the crossed diagonals to fix the centers (fig. 03).
- Set the compass properly to mark a radius of 2 ½ inches, spike the point down onto the center and cut a 5 inches diameter circle out. One circle has to be drawn on each piece of card (fig. 04).
- Set the compass approximately to the same 2 ½ inches radius and spear the point on the previously drawn circle to step off around the circumference scribing arcs (fig. 05).
- Use a pencil to number the points 0, 1, 2, 3, 4, 5 and back to 0. Write the numbers on the squander side of the circle line (fig. 06).
- To draw the first triangle, utilize a ruler and a pencil to draw lines from numbers 1-3, 3-5, and 5-1. Complete two triangles, six point star design (fig. 06) by drawing lines from numbers 0-2, 2-4, and 4-0.
- Put colors in the design using the left tips. You can color according to your preference. As an example, you might use yellow or golden color in the star where as the surrounding area is red. The outside-circle waste should be taken out by using scissors (fig. 07).
- Use the pencil-pressed lines as your guide to fold each of the circles thrice in order to contain one of the two triangles by the fold lines. You need to have a central triangle with three curve-sided flaps and in order to do that each circle of card should be folded (fig. 08).
- Take a circle, spread adhesive on the backend of the flaps to stick it carefully on one of the other circles. Repeat the same step with the other two circles (fig. 09).
- All the flaps have to be attached with one linked pair of circles with adhesive. To create the three dimensional figure you should bring two V-like units together (fig. 10).
- Just before closing up the last flat, you have to double-up and bind the piece of yarn. To make a hanging loop you have to insert the knot inside the form.
TIPS AND OTHER IDEAS
- If you like to make triangles, building three dimensional forms and drawing out circles then you can make this a large and nice project. Ask your parents to tell you about the great American architect Buckminster Fuller.
- Give it a try to put together six paper clips in case you are not comfortable about bringing the four circles of card together.
- If possible you can use a compass with screw-fixed legs.
- Press lightly while drawing pencil lines. You need to press hard as you have to fold along the drawn lines.
 Ram Navami
 Passover
 Good Morning