Halloween Crafts
Paper Plate Vampire Craft | Paper Mache Candy Bowl | Pasta Skeleton | Recycled Treat Bucket Craft | Orange Jack O'Lantern Craft | Painted Pumpkin | Halloween Banner Craft | Trick or Treat Baskets | Design your Own HALLOWEEN Puzzles | Candy Wrapper Picture Frame | Green Blob in a Bottle | Make a Spooky Popcorn Hand | Vampire Lollipop | TP Roll Mummy | Paper Plate Crows | Halloween Moon Mobile |Wooden Spoon Monster Puppet | Glittered Skulls, Bones, and Bugs
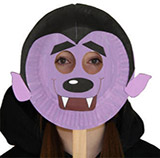
Paper Plate Vampire Craft
 YOU WILL NEED
• paper plate
• purple paint and paint brush
• something to color with (or color printer)
• scissors
• glue
• paper
• printer
OPTIONAL: You can substitute large wiggly eyes for the template eyes.
OPTIONAL FOR MASK: paint stir stick, thin strip of wood or tongue depressor.
Method:
- Paint the bottom of the paper plate purple.
- Print out the template of choice.
- Colour (where appropriate) and cut out the template pieces. Most of the pieces are simple enough shapes for young children to cut out, but if needed, an adult can help with some of the harder pieces (the ears and the hair).
- Glue the two pieces of hair on the top of the paper plate.
- Glue the ears onto either side of the plate.
- Glue the mouth at the bottom of the plate.
- Glue the nose just above the mouth.
- Glue the eyes just above the nose (or cut out holes for eyes in a mask).
- Glue the eyebrows above the eyes.
Back to Crafts Main | Go to the top
Paper Mache Candy Bowl
What you'll need:- paper grocery bags or craft paper
- large glass bowl
- aluminum foil
- small bowl
- decoupage medium
- water
- stir stick
- paint
- black craft foam
- tombstone and tree templates (at right)
- light transfer paper
- blue painter's tape
- pencil
- craft knife
- foam glue
- clothespins
- small black pompom
- black embroidery floss
- sewing needle
- white thread
- scissors
- small bird figurine
- black craft paint
- bamboo skewer (optional)
- Turn the bowl that will serve as the mold upside down and cover the outside with aluminum foil. Fold excess foil into the interior of the bowl.
- Tear the bags or craft paper into roughly 2" to 3" pieces.
- Mix four parts decoupage medium with one part water in a mixing bowl. Dip each paper piece in the solution and place on the outside of the foil-covered bowl, overlapping the paper to cover the bowl. Work with the bowl inverted over a can so that it is easy to spin. Continue adding paper until 3-4 layers of paper cover the outside of the bowl.
- Allow the bowl to dry for 24 hours.
- When the paper bowl is dry, gently peel the foil off the inside of the glass bowl, releasing the bowl from the paper shell. Gently peel foil from the paper shell.
- Paint the paper bowl. We used black spray paint on the outside and red house paint on the inside. Allow the paint to dry.
Note: Sometimes the bowl will become slightly misshapen after you paint it. To restore the bowl to its original shape, wait for the paint to dry completely, place the glass bowl you used as a mold inside of the paper bowl and let it sit for a few hours. - With a craft knife, cut a spooky tree and three tombstone shapes from black craft foam. If using templates, transfer the images onto the craft foam with light colored transfer paper, holding the paper in position with blue painter's tape. Glue these shapes to the outside of the bowl with foam glue. Use clothespins to hold the foam pieces in place while the glue dries for 24 hours.
- Create a spider by threading black embroidery floss through a small black pompom. Secure the embroidery floss "legs" by coating them with glue. String the spider on a piece of white thread and attach to the tree.
- Paint a small bird figurine black with craft paint and glue it to the tree. If the tree begins to droop, brace it with a bamboo skewer that has been painted black and glued both to the back of the tree and the top of the bowl.
Back to Crafts Main | Go to the top
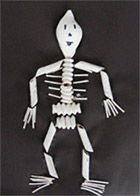
Pasta Skeleton
 What you'll need:
- Dried pasta shapes (spaghetti and quills are ideal for bones and shells for skulls)
- White paint
- Black paper
- Glue
- Black pen
- Paint your pasta white and leave to dry.
- Lay out a design of a skeleton on your paper. When you are happy, glue into place.
- Finish off by drawing a face on to your skeleton.
Back to Crafts Main | Go to the top
Recycled Treat Bucket Craft
 What you'll need:
- 1 recycled milk container, washed well
- 2 sheets of orange paper (construction, card stock, or scrapbooking)
- 1 sheet of black felt or craft foam
- 2 green pipe cleaner stems
- markers
- glue dots
- scissors
- hole-punch
- pencil
- Gather together your materials.
- Fold a piece of paper in half and draw pumpkin stem in the top area of the paper. To draw it, make a round or oval shape, then draw a few lines going down from the side edges and the middle.
- Draw the round part of the pumpkin around the stem, and add a few wrinkle lines coming down from the stem. Draw 3 more pumpkins the same way on your remaining orange paper. Note: make two of the pumpkins shorter, to better fit on the handle sides of the jug.
- Cut out each pumpkin around the outline.
- With a washable marker, draw a line around the lid area of the milk jug, and down around the front of the jug.
- Cut around this line with a pair of sharp-pointed scissors, leaving the handle intact. (See photo.)
- Attach the four pumpkins to the sides of the milk container with glue dots.
- Make a hole in one of the front pumpkins with the hole-punch.
- Thread a pipe cleaner stem through the hole. Twist the stem to secure it to the pumpkin, and then twist it around the pencil to make the curly pumpkin vine tendrils.
- Do the same with the other front pumpkin so it also has a pipe cleaner vine.
- With felt or craft foam, cut pumpkin eyes, noses, and mouths to decorate your pumpkins as jack-o'-lanterns. Attach the facial features with glue dots. Alternately, draw faces on the pumpkins before you attach them to the container.
Back to Crafts Main | Go to the top
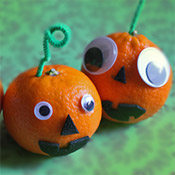
Orange Jack O'Lantern Craft
 What you'll need:
- 1 orange, regular size or a small variety like mandarin or tangerine
- 2 googly eyes
- black self-stick craft foam
- ½ green pipe cleaner stem
- 2 glue dots
- scissors
- pencil
- Cut out a jack-o'-lantern mouth and triangle-shaped nose from the self-stick craft foam.
- Place a glue dot on the back of 1 googly eye and adhere it to the orange. Repeat with the second googly eye.
- Stick craft foam nose and mouth to orange.
- Wrap the half piece of green pipe cleaner stem around pencil to make it curly.
- Stick the curly stem into the top of the orange.
Back to Crafts Main | Go to the top
Painted Pumpkin
This painted pumpkin or Jack-o-lantern is a fun alternative to carved pumpkins when there are young kids who want to get involved, and it lasts longer too.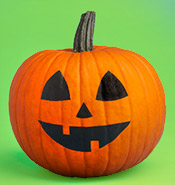 What you'll need:
- Black paint
- Pumpkin
- Acrylic varnish (optional)
- Simply paint your Jack-o-Lantern face onto your pumpkin with black paint. You can sketch out your design on to paper first and then draw it on to the pumpkin in black pen (this can be washed off as many times as you want until you are happy with the face). For younger children you may want to draw an outline for them to colour in.
- A coat of acrylic varnish will protect the face.
Back to Crafts Main | Go to the top
Halloween Banner Craft
What you'll need: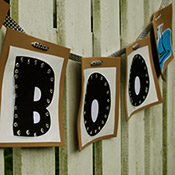 foam sheets (these can be purchased easily from your local craft store; they usually run under a dollar a piece and come in a wide variety of colors)
 - white card stock (I got this in the scrapbooking section of the store because you can buy it by the sheet)
- letters to spell whatever word you're using (I printed mine using Microsoft Word, in the Showcard Gothic font, in 475 pt size)
- pictures to go along with your chosen theme (again, using Microsoft Word, I found free clipart and used those pictures)
- scissors
- glue or double-sided tape
- ribbon (choose a color or pattern that coordinates with your foam tiles and paper) you'll need enough to thread through each of the foam tiles, and a little extra for hanging
- standard hole punch and decorative hole punch
- Measure and cut your foam sheets to 6-3/4x6-1/4. You'll need one for each letter of your chosen word, and an extra foam square for both ends of the banner as well, to add a picture.
- Cut your white cardstock to 5-1/2x5-1/4. You'll need one piece for each letter of your word. The measurements don't have to be precise, but you want all the pieces to be the same size, and the cardstock pieces to be a little smaller than the foam pieces, so you're creating a bit of a frame.
- Glue each piece of cardstock onto the front of each foam piece, one for each letter of your word. You can also use double-stick tape for this step as well.
- Cut out each letter of your word, and glue it to the center of the white cardstock. The 475 font size I used fit perfectly on the cardstock, allowing a nice section of white space all around. If you're using a different font, you may want to play around with the sizes to get the right fit. Before I glued the letters down, I used a swirl paper-punch and punched out holes all around the perimeter of the letter to allow a bit more of the white cardstock to show through.
- If you are adding foam pieces with a picture on either end (as I did with the ghost and the witches' hat pictures), then cut them out and glue them to the foam. Be sure to allow extra room all around so you can still see the foam square, for continuity when it hangs alongside the other foam pieces.
- Using your regular hole punch, on the top of your foam square, measure in 2-1/4 inches from the left side and punch a hole (leave about a ¼ inch from the top). Now do the same on the right side. You'll be using these holes to thread your ribbon through, to hang the banner.
- Starting from left to right, thread the ribbon from the back of the tile into the first hole, straight across the front to the second hole. From the back of the second hole, you then thread it into the next tile. Continue until all the tiles are threaded, leaving a little bit of ribbon in between each tile, and a little extra ribbon on either end for hanging. For my five tiles, I used 53-1/2 inches of ribbon.
Back to Crafts Main | Go to the top
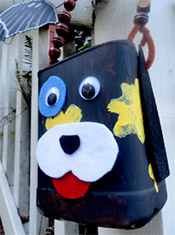
Trick or Treat Baskets
What you'll need:- Materials
- Empty orange juice or milk jug
- Duct tape
- Non-toxic acrylic paint
- Felt
- Tacky Glue
- Googly eyes
- Mod Podge or PVA glue
- Pipe cleaner
- Beads
- Use sharp scissors to cut off the top of the jug.
- Tape the rough edges with duct tape or clear packing tape.
- Paint jug with acrylic paint.
- When paint is dry, use felt, construction paper and googly eyes to give the carrier a personality.
- Add a handle with pipe cleaner and beads.
Back to Crafts Main | Go to the top
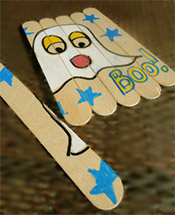
Design your Own HALLOWEEN Puzzles
 What you'll need:
- 6 or More Popsicle Sticks (the more you have, the more challenging the puzzle)
- Paint Pens or Markers
- Masking Tape
- Tape the tops of the Popsicle sticks side by side with masking tape.
- Use paint pens or markers to draw a favorite Halloween image.
- Allow time for paint to dry.
- Carefully remove the tape and mix up the sticks. The puzzle is now ready to be put back together!
Back to Crafts Main | Go to the top
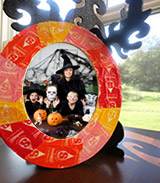
Candy Wrapper Picture Frame
 What you'll need:
- Unfinished wood frame (available at craft stores)
- Mod Podge or PVA glue
- Candy wrappers
- Trim wrappers as desired.
- Use Mod Podge to affix wrappers to frame.
- Add a topcoat of glue to seal.
- Allow to dry and then add picture.
Back to Crafts Main | Go to the top
Green Blob in a Bottle
What you'll need:- corn syrup
- empty clear bottle/jar – with or without a lid
- green food coloring
- crafting googly eyes
- Pour corn syrup into your jar. Add 2-3 drops of food coloring. Now add your googley eyes. These will float, unless you glue on a weight to the back of the eyes, or something heavy. Now your Blob is ready for display. Keep these ghoulish eyes on hand, you may have a monster visit with only one eye that might need a spare!
Back to Crafts Main | Go to the top
Make a Spooky Popcorn Hand
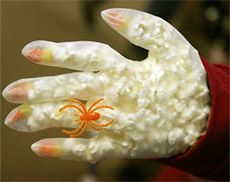 What you'll need:
- Project Materials:
Popcorn, on hand
Candy Corn
Kitchen Gloves
Plastic Halloween Rings
- About the Supplies:
Be sure to use food-safe gloves especially for kitchen prep (you want to make sure they’re approved to touch food!) You can buy a package of disposable kitchen prep gloves at your local restaurant supply store or Cash & Carry. I found them online: a 100 pack for less than a dollar.
You should be able to find Halloween rings at your local party or dollar store. Or, online at Oriental Trading Company.
Put a candy corn in each fingertip. Fill fingers up with popcorn, and slip a ring on the ring finger. Fill remaining hand up with popcorn and tie with twisty tie, rubber band, or ribbon. If you have trouble fitting the ring over the popcorn, cut the back of the ring open, and it will slip right on.
Kids can help assemble these treats to give out on Halloween night, or to bring to school (if your school allows homemade treats).
Back to Crafts Main | Go to the top
Vampire Lollipop
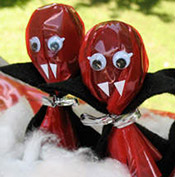 What you'll need:
- Red cellophane
- Lollipops
- Black felt
- Twist ties
- White address labels
- Scissors
- Peel and stick wiggle eyes
- Pattern
- Using the pattern, cut capes (one for each lollipop) from black felt.
- Cut a piece of cellophane into a square, large enough to wrap around the head of the lollipop.
- Loosely wrap the cellophane around the lollipop and place the wrapped lollipop onto the felt cape.
- Wrap twist tie around both at the neck of the lollipop.
- Cut fangs from white address labels and stick to the front of the lollipop. Attach peel and stick wiggle eyes to the front of the lollipop.
Tips: To add some variety, try using different colors of cellophane such as orange, green, or purple. - Bend the ends of the twist ties to look like bow ties.
- Try creepy eye Halloween stickers instead of wiggle eyes.
Back to Crafts Main | Go to the top
TP Roll Mummy
What you'll need:- TP roll
- 1 sheet white paper towel
- Glue
- Google eyes or black marker
- Scissors
- Cut your paper towel in 1/2 inch strips.
- Begin to wrap your strips of paper towel around the tp roll, gluing as you go. Make sure you leave a little opening at the top of your roll. When you have wrapped your mummy enough, glue on some google eyes (or draw them on with a black marker).
Back to Crafts Main | Go to the top
Paper Plate Crows
What you'll need:- 1 paper plate
- Black craft paint
- Paintbrush
- Orange, black, and white construction paper
- Scissors
- Craft stick
- Black marker
- Tape
- Pattern
- Turn paper plate upside down and paint backside black; allow to dry.
- Use pattern to cut out two black wings, white eyes and an orange beak.
- Use black marker to color in the eye pupils.
- Use glue stick to attach the beak to the bottom of the eyes.
- Glue the eyes and beak to the paper plate.
- Tape the wings to the back of the paper plate.
- Use the scraps from the black paper to cut out eyelids, use the eye pattern as a guide. Glue to the tops of the eyes.
- Cut a tuft of hair from the black paper and glue to the top of the paper plate, attach on the backside.
Back to Crafts Main | Go to the top
Halloween Moon Mobile
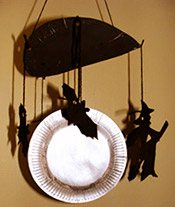 What you'll need:
- Black card
- Black yarn or thread
- Silver paint
- Black paint
- Small paper plate
- Large paper plate
- Our Halloween tempates
- Scrap paper
- Laminating sheet
- Paint the large plate black and the small plate silver and leave to dry.
- Use our Halloween templates printed on to scrap paper to help you cut out three bats and a flying witch from black card.
- Make a hole in the centre of the black plate.
- Punch a hole in the edge of the small silver plate and tie a length of yarn through. Push the other end through the hole in the black plate and tie or use sticky tape to secure.
- Make six holes around the edge of the black plate. Punch a hole in each of the black card shapes and, with a piece of yarn, tie each to a hole in the black plate.
- Make 2 more holes on opposite sides of the black plate and tie a length of yarn to form a loop to hang the mobile.
- If needed you can stick a lump of sticky tack on the top of the mobile so it hangs even.
Back to Crafts Main | Go to the top
Wooden Spoon Monster Puppet
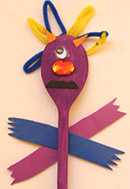 What you'll need:
- A wooden spoon
- Bright paint
- Glue
- Wiggle eyes, craft foam, pipe cleaners (obviously anything you have in your craft box can be used.
- Paint your spoon and leave it to dry.
- Glue on eyes and any other decoration you like to make your monster.
- We used pipe cleaners as hair, foam as horns, mouth and our monster's four arms, and a gem as a nose.
Back to Crafts Main | Go to the top
Glittered Skulls, Bones, and Bugs
What you'll need:- Tools and Materials
- Skull and bones
- Glitter
- Craft paper
- Craft brush
- Glue
- Large shallow bowl or tray
- Plastic bag
- Working over a sheet of craft paper or newspaper, use a craft brush to apply glue to half of a skull or bone.
- Hold object over a large shallow bowl or tray. Spoon ultrafine opaque glitter over glued surface, making certain the glitter falls into all the crevices and sockets. Place on a tray; let dry for at least an hour.
- Tap or brush off any excess glitter. Repeat gluing and glittering process on uncoated surface of each piece, and check to see if other areas require a touch-up.
Back to Crafts Main | Go to the top
 Mother's Day
 Passover
 Good Morning
Looking for Something? Search Google :