This Independence, decorate your homes with these wonderful decoration ideas. These are just some ideas which you can carry out. Your imagination is but your limit for the rest. Without further ado let us begin.

The Box-pleated bunting adds a crowning touch to an outdoor structure or gazebo. You can trim the traditional flag design to denote the blue-and-white part of the pattern. Iron the pleats as you make them when it comes to crisper folds.
MATERIALS
Scissors
Straight pins
Wide pale-blue grosgrain ribbon
Sewing machine
A high roll of flag-pattern bunting 12-inches long
STEP 1
Measure the length for the trim that you desire. Then, roll out the bunting to a length which is roughly twice the length of your measurement and cut.
STEP 2
Trim the four stripes at the bottom (white, red, white, red) throughout the entire length of bunting.
STEP 3
Take the fabric and pleat it. Firstly, lay down the fabric. Make sure it is placed wrong side up because the blue blocks of stars must run along the bottom. For making a single box pleat, apply a crease on both the edges of a white-and-red block (this is where the stripes meet up with the blue block). After that, fold both the creases so that they meet in the middle and cover the stripes. What you are effectively doing is matching blocks of blue to blocks of blue.
STEP 4
Pin in place. Simultaneously, pin the ribbon in place, covering the two stripes at the top. Repeat this process along the length of fabric.
STEP 5
Finally, sew along the top of the panel and through the pleats and ribbon. Use a straight stitch for this. Then, remove the pins and hang it with the nails or as you please.
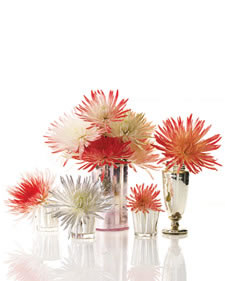
These are inexpensive and easily available. You can tint the spider mums to make them look like fireworks. Also, different colors of blooms can be grouped of in assorted vessels for a scintillating display.
MATERIALS
Floral spray
Spider mums
STEP 1
Hold the flower upside down catching it by the stem.
STEP 2
Spray the tips, twirling the stem in your fingers to coat evenly. Give some blooms a lighter coat, and darker on the others.
STEP 3
Arrange them in vases.
Fabric star medallions will resemble daytime fireworks and light up your home. Standard cotton prints should be used for this project, nothing too light or heavy. To help creases keep their shape use spray starch.
MATERIALS
Cotton fabric about 2 and half feet per medallion
Iron
Sewing machine
Scissors or rotary cutter
Heavy spray starch
1/4-inch-wide ribbon
Fusible webbing half an inch by 20 yards
Strong double-sided tape (optional)
STEP 1
Take the fabric and cut a length of it, the width being the diameter of the medallion. The length has to be exactly 1.6 times the width.
STEP 2
Fold the fabric accordion-style making 1 and half inch sections. After making each fold, spray it with iron and starch, continuing up length of fabric. Be careful to ensure your first and last folds are in the same direction.
STEP 3
For creating a pivot point, stitch along the middle of the folded rectangle
STEP 4
Trim both the ends of the pleated rectangle making a 45-degree angle. This is to ensure the angles slope towards the edge, which is raw, of the fabric. These cuts are made to create the medallion's star-like points.
STEP 5
Connect the sides of the rectangle by puffing out fabric from the center stitch and adhering with mellow webbing, iron. After that, sandwich a piece of ribbon, which has to be long enough for hanging the medallion, between the mellow webbing and the fabric.
STEP 6
Connect the remaining sides with mellow webbing. You could also tape for easy dismantling and storage. Stitch a monofilament through the fused edge in the back, and finally hang it.
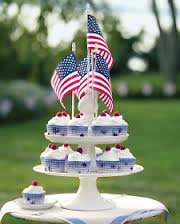
It’s best to put it on top of a two-tiered cake stand for creating a mini cupcake monument.
MATERIALS
Primer
Circular wooden piece (optional)
Wood glue
Flags
Wooden finial
Drill
Sandpaper
White paint
Paintbrushes
Wooden plaque of 4 and half inches
Two-tiered cake stand
STEP 1
Firstly, prime and print the wooden finial and plaque. Then, mark three spots at the base of wooden plaque, making sure they are evenly spaced and a quarter of an inch from the edge. Drill pilot holes an eighth of an inch for smaller hole, increasing the size of drill a bit thereafter. This ensures cleaner holes.
STEP 2
Drill holes in the diameter of the flag dowels at the base of the wood and use the marks as a guide.
STEP 3
Drill a hole in the diameter of a flag dowel in the same manner as above but this time on top of the wooden finial.
STEP 4
Stick the finial to the wooden base. Then, drill a hole in the center of the plaque, this time slightly smaller than the diameter of the screw. If your finial does not have a screw end, attach it to plaque with wood glue. A circular wooden piece may also be added in the centre for height if required.
STEP 5
Finally, insert flag dowels into the drilled holes at the base and the finial. If desired, you may sand them till they snugly fit in the holes.
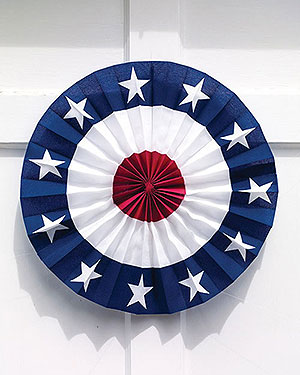
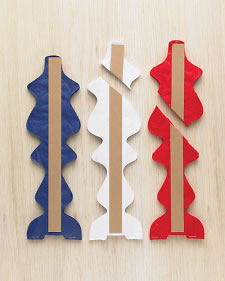
These round white, red and blue medallions offer a new take on an icon. Trimming and piecing the bunting yields a bull's-eye pattern.
MATERIALS
18-inch-wide bunting
Fusible webbing, half an inch by 20 yards
Monofilament
Scissors
Iron
Sewing machine
Strong double-sided tape (optional)
STEP 1
Firstly, you must measure two 39-inch-long pieces of bunting. Then cut 2 similar pieces of bunting. Begin cutting after a star and end just before one. This will ensure you have about 3 inches of blue on each end. For easier pleating, trim off the hems.
STEP 2
Join the two pieces together side by side making sure stars line up. Overlap by half an inch, and adhere using mellow webbing and using iron to fuse. If you desire, stitch the half inch overlap together. The final width should be roughly 32 inches.
STEP 3
Trim off the white and red stripes on both sides, this will result in a 5-stripe pattern: blue, white, red, white and blue, in that order.
STEP 4
Fold fabric accordion-style in 1 and a half inch sections. Be sure to iron after each fold, continuing up length of fabric. Make sure your last and first folds are in the same direction.
STEP 5
For creating a pivot point, stitch along the middle of the folded rectangle.
STEP 6
Connect the remaining sides with mellow webbing. You could also tape for easy dismantling and storage. Stitch a monofilament through the fused edge in the back, and finally hang it.
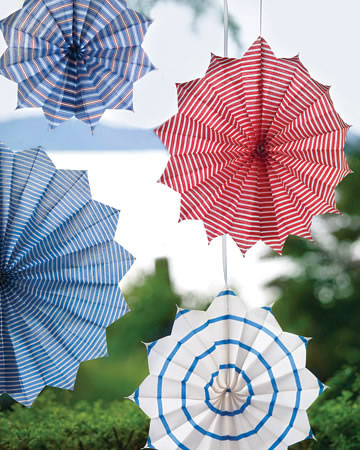
These tissue-paper fans make a welcome addition to a gazebo or a porch, opened halfway and layered.
STEP 1
Create fans of various sizes by trimming unstapled ends diagonally along the closed fans. Open each fan halfway and peel off many layers from one side, keeping the staples in place.
STEP 2
To hang the fans use painters' tape.
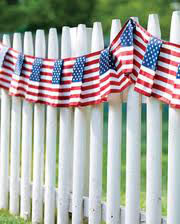
You can greet guests by means of a festive swag made of flags.
MATERIALS
Scissors
Straight pins
8-inch-wide bunting
Sewing machine
STEP 1
Measure the required length of your swag.
STEP 2
Cut 1 and a 3 quarter times this length of bunting.
STEP 3
Take the fabric and pleat it. Firstly, lay down the fabric. Make sure it is placed wrong side up because the blue blocks of stars must run along the bottom. For making a single box pleat, apply a crease on both the edges of a white-and-red block (this is where the stripes meet up with the blue block). After that, fold both the creases so that they meet in the middle and cover the stripes. Be sure to spray the folds with starch and iron as you go.
STEP 4
Finally, sew along the top of the panel and through the pleats and ribbon. Use a straight stitch for this. Then, remove the pins and hang it with the nails or as you please.
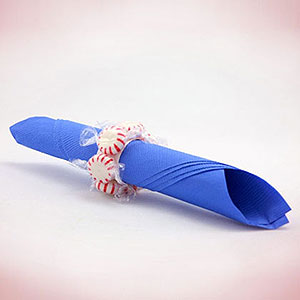
With our red, white, and blue napkin rings add a splash of patriotism to Independence Day.
MATERIALS
Cloth napkins
Buttons
Fabric glue
Grosgrain ribbon
Covered elastic
STEP 1
For each napkin ring, you will require a 15-inch-long piece of half an inch wide grosgrain ribbon. To start with, make a series of half-inch accordion folds in the ribbon and hold them in place as you go. Then, push a threaded needle with a 1 inch tail through the gathered folds and along the bottom edge.
STEP 2
Then carefully slide the folds into the shape of a circle holding on to both ends of the thread. Tie the ends of the thread into a knot before closing the circle and snip off any excess in the process.
STEP 3
To create a full circle with a small hole in the middle, glue the ends of the ribbon together with fabric glue. After that, thread 4 inches of covered elastic through 2 holes of a button, tying the ends into a knot. Be sure to glue the button to the bottom side’s centre, of the burst.
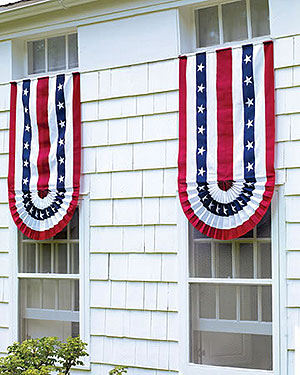
This project is actually easier than it appears to be. Simply join two pieces of fabric side by side, and then pleat the bottom. While sewing, machine-stitch slowly and use a hand-stitch or a heavy needle.
MATERIALS
Iron
18-inch-wide bunting
Rotary cutter or scissors
Fusible webbing, half an inch by 20 yard
Sewing machine (optional)
About a quarter inch rectangular dowel (3 feet long)
Half an inch round dowel (3 feet long)
Disappearing-ink pen
Strong double-sided tape (optional)
Eye hooks
STEP 1
Measure the required length for the flat part of the preparation. Add 30 and half inches for the pleated half-moon and 1 and a half inches extra to be used for hanging. This is merely half the length of bunting necessary for the decoration.
STEP 2
Then cut 2 identical pieces of bunting. Begin cutting after a star, end just before one. This will ensure you have about 3 inches of blue on each end. You may trim off hems for easier pleating.
STEP 3
Join the two pieces together side by side making sure stars line up. Overlap by half an inch, and adhere using mellow webbing and using iron to fuse. If you desire, stitch the half inch overlap together. The final width should be roughly 32 inches.
STEP 4
Mark the fabric 30 and half inches, with disappearing-ink pen, from the bottom edge.
STEP 5
Then, pleat the half-moon. Begin with the bottom edge, make 1 and half inch accordion folds and be sure to iron after each fold. Continue this process up length of fabric, and stop at the mark you made. The fabric’s raw edge should point down.
STEP 6
To create a pivot point, stitch along the center of the pleated rectangle. Crease with iron after making one more fold.
STEP 7
With fusible webbing, iron, attach rectangular dowel in the crease fabric side up.
STEP 8
For hanging sew a channel at top of swag. Fold fabric over 1 and half inches, stitching 1 inch from top edge. Insert a round dowel.
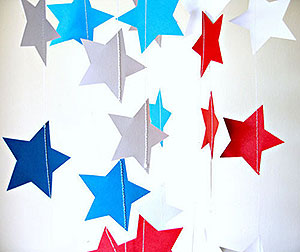
With this jaunty string of stars, fly the nation's colors on the Fourth.
STEP 1
Cut two four-pointed stars from patterned origami paper and one from solid-color card stock for each ornament.
STEP 2
Use glue stick to sandwich the card-stock star between the decorative ones, making sure the right sides face out. Stagger the tips to make an eight-pointed star.
STEP 3
Machine-stitch through one axis of a big red star and sew 4 inches beyond its tip, or you could lift foot and pull out 4 inches of thread. After this, pick up once again at the blue star’s tip. Repeat this process alternating between colors.
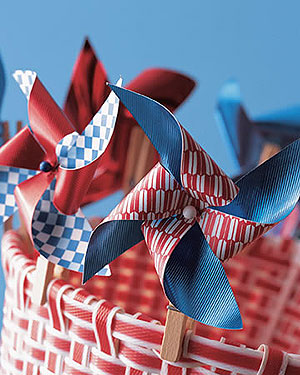
These patriotic whirligigs are so pretty that they'll make you dizzy. They're attached to clothespins so that you may clip them to almost anything, for example a bicycle basket.
MATERIALS
Pencil
Clothespin
Map tack
Scissors
Glue
Patterned paper in two colors
STEP 1
Cut two 5 inch squares in unlike colors from that of patterned paper. Glue them back-to-back and leave to dry.
STEP 2
Draw diagonal lines one corner to the other. Then, make a 3 inch cut along each line. Finally, fold every other point towards the center and clue glue. Attach it to clothespins with map tack.
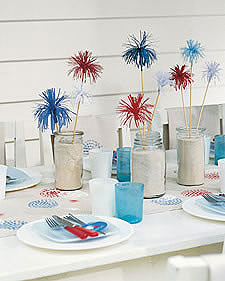
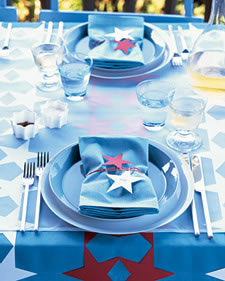
Here's another decoration concept for July 4th. Begin with napkins, seating cards and a runner in bursts of blue, white and red. Then, to bring more fireworks to the table, add a set of paper pom-poms attached to skewers. Stick the skewers into sand-filled jars, or a cheese plate or into a cake.
MATERIALS
Napkins, a runner, and seating cards in bursts of white, red and blue
Skewers
Sand-filled jars (optional)
Vellum
Scissors
Kitchen scrub brush
White pen
Paper pom-poms
STEP 1
Fold a 3-by-15-inch piece of vellum in half. Do this twice, lengthwise. Cut slits every eighth of an inch, leaving the inch at the top uncut. Unfold the paper, and attach, to one uncut corner, a 1-inch piece of double-sided tape. Then, adhere it to a bamboo skewer, and wrap the paper around many times.
STEP 2
Use another piece of double-sided tape to secure once you reach the other end. With the edge of a scissor blade, curl the lower strips, as you would in case of a ribbon.
STEP 3
Dip into fabric paint the bristles of a kitchen scrub brush from a crafts store. Press the bristles firmly against the fabric.
STEP 4
To create patterns on paper place cards, use smaller bottle brushes. Then handwrite the names using a white pen.
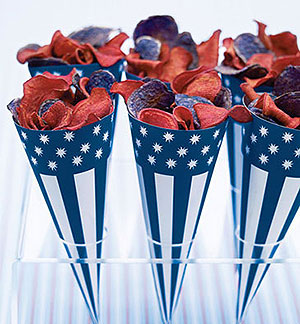
This easy-to-make container is something to cheer for and is filled with a mix of beet and blue-potato chips.
MATERIALS
Waxed paper (optional)
Red cone clip art
Matte heavyweight paper
Craft knife or scissors
Glue stick or double-sided tape
Blue cone clip art
STEP 1
Print the clip-art image (blue or red) and trim. Then, you can fold back to create a tab, after scoring along a dotted line.
STEP 2
Wrap to form the cone, and attach the sides with double-sided tape or glue stick. Fill the inside of the cone with waxed paper if desired to prevent grease marks.
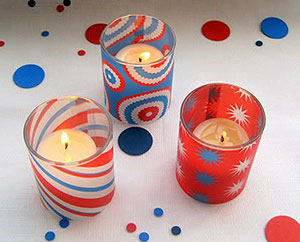
When twilight overcomes sunset this Fourth of July, you can add a bit of light to the festivities by transforming glass containers of various sizes into patriotic votives. The process is easy to follow, and all the necessary materials are easily available at local crafts stores.
MATERIALS
Cylindrical clear-glass containers (assorted)
Tape measure
Rotary cutter or edges
Double-sided tape
Glassine sheets in red, white, and blue
Glue stick
STEP 1
Measure the circumference and height of the container and add half an inch to the circumference. To these measurements cut a piece of glassine. Adhere the glassine using the double-sided tape after wrapping it around the container.
STEP 2
To create patterns and decorations on the votive use the remaining colors. They can be stripes of colored glassine. To give the stripes an added visual appeal, cut them with the edges or rotary cutter. Using the double-sided tape or glue stick, attach the decorations to the votive.
Add flamboyance to your Fourth of July party with starry tabletop runners, which are made from red and white paper. By tracing a four-star template onto accordion-folded paper and snipping multiples, the motif can be produced. For the runners, use a blue tablecloth as a base, covering them with organdy.
Everyone has an idea of what to do with bandannas. You can tie them around the dog's neck, drape them babushka-style over your head on painting day and spot them in old Westerns. However, none of these applications captures the bandanna's beauty. Look closely at its wavy flourishes and bitty stars, flashy as fireworks, and you'll see the spark of an all-American party.
MATERIALS
Craft knife
Heavy red and white paper
Tape and double-sided tape
Pencil
Small star template
Star template
Card stock
Bone folder
Red string
STEP 1
Download a large four-star template as you desire and print it onto card stock. Cut out the downloaded template by using a craft knife.
STEP 2
Cut a sheet of heavy red paper to 7 and a quarter by 29 inches. With a pencil, mark 1 long side at 7 and a quarter inch intervals. Accordion-fold the paper at marked intervals by means of a bone folder.
STEP 3
Place your template on top of the paper and let the points of the stars hang just over the folds. Now, carefully trace. Cut around the template and through layers. Leave the stars attached where the points touch and at folds. Repeat this process with more red paper. Unfold and connect cutouts with tape at the back. Finally, repeat this process again using heavy white paper.
STEP 4
Using double-sided tape secure runners to tablecloth, and top with organdy.
STEP 5
Follow STEP 1 as above but download a smaller star template. Trace them onto heavy red and white paper and cut out 1 white star and 1 red star for each guest.
STEP 6
Write your guest's name on white star, and pierce the tops of both. Lastly, thread the stars onto red string.
This Fourth of July, add sparkle to your table with our easily to make napkin rings. These star-spangled wrappers will add bursts of color to outdoor meals all month long and patriotic flair to a picnic on Independence Day.
STEP 1
Onto white card stock, print templates.
STEP 2
Snip along dotted lines and cut out along the perimeter.
STEP 3
Wrap a strip around a rolled napkin and secure it by tucking slits into each other.
By Kinjal Sen
 Mother's Day
 Passover
 Good Morning