Craft Ideas for Indian Independence Day
Indian Tricolor banner
All you need:
White glue
Orange, white, and green colored pencils
Orange, white, and blue markers
Scissors
Sticker of the blue wheel with 24 spokes
(or a cut out from a picture)
Instructions:
1. Cut shapes out of the Orange, white, and green construction paper.
2. Glue the shapes onto a base sheet 14"X17" or larger. This sheet should be red, white, or blue.
3. Draw additional details on the flag with a pencil.
4. Trace the pencil lines with markers.
4. Tell your friends what the colors and shapes symbolize in your flag.
5. Hang up the flag for Memorial Day!
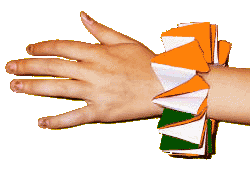
Freedom Bracelet
All you need:
saffron( or orange), green and white paper
transparent tape
glue
scissors
Instructions:
Cut strips of paper that are about 2 inches wide (the lesser the width, the thinner will be the bracelet) and 12 inches long.
Cut 5 orange strips, 5 green strips and 10 white strips.
Lightly glue a white strip to the back of each of the orange and green strips.
Now tape all the orange strips together end to end. So you have one LONG orange strip.
Repeat the process for the green strips.
Now, accordion fold the strips. Place them like an L and then fold over each other in an alternating pattern
... see diagram below... (solid colors are the front and slashed colors the white back of the paper)

When you run out of paper, trim ends as necessary and tape so it doesn't unravel.
Roll into a circle and tape to form a bracelet (see photo for how it looks)
Freedom Collage
Make this collage using your imagination.
All you need:
for the base:
White construction paper
water color tubes
- orange, white, green
a color palette
2, or, 3 old toothbrushes
some board pins or weights
for the collage:
colored pictures and stickers of freedom fighters, Red Fort, Parliament House
etc.
glue sticks
Instructions:
Cut the construction paper in the shape of a banner with size 18"X10".
Spread it out and pin the corners or put some weights.
Squeeze out color (say the orange one) on the palette and make a thin layer of paste with water.
Now wet a toothbrush and dunk it in the color. Hold the brush upside down and run your finger(s) through the
top of the nylon bristles.
Precaution: Check out if the dots of color appearing on the paper are fine and evenly skewed.
Otherwise shake excess water off the brush.
Starting with the orange shade, you can concentrate on the upper portion of the paper and
as you move down the dots should appear lesser. When you finish there should
be a horizontal orange band - deeper at the top, lighter at the bottom as it
fades away into the white.
Repeat the process with green color starting with the opposite end.
(Better, you turn the paper upside down, before getting started with the
green.)
Likewise the horizontal orange band, the green band should also gradually
fade away into the white portion of the paper.
Now spray the white lightly around the middle, along the line where the orange and the green have overlapped.
Leave the whole thing to be dried. Meanwhile, concentrate on the pictures
and stickers you have already collected.
When you are sure, the base is dry, paste the pictures and stickers.


 Friendship Day
 Good Morning