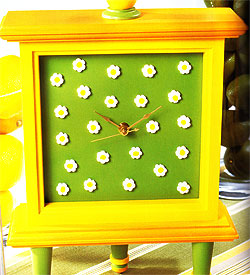
Field of Daisies Clock
Keep the look of the fresh flowers in the room all year round with this clock overflowing with tiny white daisies. It won’t be hard keeping up with the time with this great piece.
Materials
Wooden clock surface ("Carriage Clock," Walnut Hollow)
Clock parts
Wooden glue-ons:
23micro daisies (Lara’s Crafts)
3 Lighthouses (Lara Crafts)
1 round cap, 1½" (38 mm)
1 ball, 1¼" (32mm)
Apple Barrel Paints:
Apricot
FolkArt Paints:
Fresh Foliage
Lemon Custard
Winter White
½ -inch (12mm) flat brush
1-inch (25mm) flat brush
medium-grade sandpaper
Tack Cloth
Wood Glue
Matte Spray Sealer
1. Sand and prep the clock surface. Basecoat the entire clock surface with Winter White. Sand and add a second coat for best results.
2. Paint the top and bottom of the clock and body with Apricot.
3. Paint Lemon Custard around the center of the clock.
4. Remove the square center from the clock’s housing, and using the 1-inch (25mm) flat brush brush, paint two coat of Fresh Foliage, sanding lightly between coats. When it is dry, replace it in the clock housing.
5. Paint the micro daisies with two coats of Winter White. Dot the center with Lemon Custard. Paint the top cap with Apricot.
6. For the feet, paint the body of lighthouses with Fresh Foliage and the detail ring with Lemon Custard. Paint the top cap with Apricot.
7. Paint the round cap with Fresh Foliage and the ball with Lemon Custard.
8. Arrange the flowers overt the entire square center of the clock, then glue them in place. Glue the lighthouses, top cap down, onto the bottom of the clock. Glue the ball and the round cap to the top of the clock. Refer to the photo for specific placement.
9. Spray the clock with matte spray sealer for protection.
10. Attach the clock parts following the direction on the package. You will need battery to make the clock run.
Tip: For projects that have removable inserts, such as this piece, or nay ready-made frame, having the temporary, flexible points either break or fall out can be frustrating, a staple gun works great to refit items into their original housing. Be sure to hold the gun ½" (12mm) away from the surface when shooting. Or staple will go all the way in.
Back to Crafts Main


 Friendship Day
 Good Morning
