Game Lampshade
Create a chic lampshade which will be evergreen. Theme it to games, and make a games lampshade will go with most decorations. Think of the possibilities. By the way, do you have an eight?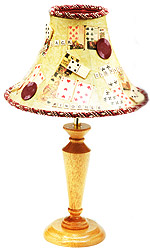
Materials
Lampshade
Thin Cardboard
Poker chips
Wooden dominos
Burgundy cord trim
Double – sided adhesive sheet
Transparent tape
Craft glue
Deckle – edged scissors
¾ - inch (19mm) wash brush
Spray can
Paper Palette

About the Papers
The playing cards are new but have vintage look and can be found in the scrapbook section of the most craft stores. I found three different patterns that coordinated nicely and then added game pieces to the lamp for dimension.
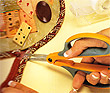
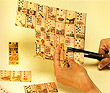 1. Cut Out the Cards
Use the deckle- edged scissors to cut out card shapes from all three of the papers. Vary the amount of cards that you leave connected (cut some that are connected horizontally, some that are connected vertically, and some that are singles).
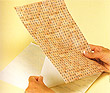 2. Add dimension to Scrabble Paper
To give the Scrabble paper more dimension, mount it to a piece of cardboard with a sheet od double-sided adhesive and set it aside.
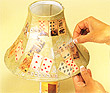
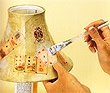 3. Apply Card Pieces to the Shade
Apply decoupage medium to the outside of the lampshade, using the wet brush. Add the cut-out paper pieces in a random fashion and apply more medium over the top of the papers. Continue adding card pieces around the entire shade. Place the lampshade on top of a spray can when you are working on it. This will lift it off your work surface and allow you to spin the shade as you work.
 4. Add Letters to the Shade
Cut out the Scrabble letters that spell card games. The word that I used is bridge, manipulation, rummy, go fish, canasta, old maid, kings, blackjack, pinochle, slapjack and hearts. Arrange the Scrabble letters in row so you can see how much space the words will require. Use decoupage medium to add the words randomly to the lampshade.
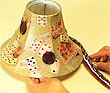
 5. Adhere the Game Pieces
Add dominos and poker chips to the shade, adhering them with craft glue.
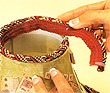
 6. Adhere Burgundy Trim to the Shade
Lay the burgundy trim around the bottom of the shade and cut a piece that is about 4” (10cm) larger than the circumference. Cut a second piece of trim for the top of the shade, again leaving about 4” (10cm). If you place a piece of transparent tape around the trim before you cut it, it will prevent the trim from fraying. Apply glue to the portion of the trim that goes on the inside of the shade. Put the shade flat on your work surface. Lift one edge of the shade and slide the edge of the trim under the shade. Press the shade down on the top of the trim to hold it in place while the glue dries. Continue lifting the shade and sliding the trim underneath.
 7. Cut the Burgundy Trim
When the trim is all the way around the bottom of the shade, center a piece of tape around the trim at the spot you will want to cut it, and then cut the trim at the center of the tape. Place a bead of craft glue on the end of the trim. Press the two ends together to bond the raw edges. Remove the tape when the glue has dried completely.
 8. Repeat for the Trim at the Top
Repeat the gluing process for the length of trim that goes around the top of the shade, starting it at the same seam as the bottom piece.
Back to Crafts Main
 Friendship Day
 Good Morning
