Materials Needed :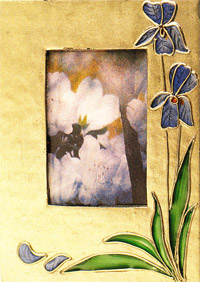
- 2-ounce (60g) blocks of polymer clay: 1 black
- tracing paper and pencil
- two ceramic tiles
- darning needle
- tissue blade
- silver powder
- gloss varnish
- paintbrush
- Envirotex Lite, Crystal Sheen or Epoxy (cold) enamels
- transparent epoxy colors: blue, green, amber (or use tiny amounts of oil paint)
- mixing cups
- tile or palette to mix on
- tapestry needle
- shoebox to cover the frame while the enamel sets
- acetate sheet (optional)
- superglue
- black carpet tape or masking tape
- thick cardstock
- heavy-duty craft knife
- metal straightedge
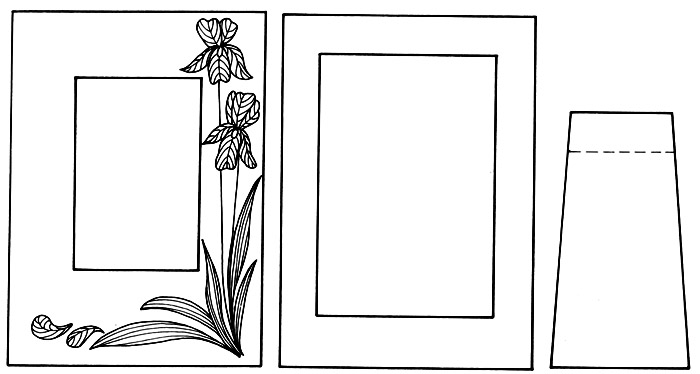
Click here for the pattern
1. Preparation
Trace the frame front onto tracing paper and the frame back onto thin cardstock. Cut these out to make templates.
2. Make the frame front
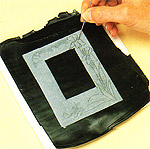
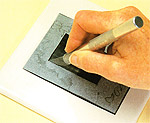
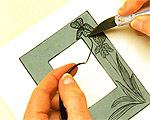
Roll the black clay into a sheet about 3/32" (2mm) thick and place it on a tile. Lay the frame front tracing on the clay and scribe over the outline of the design with a darning needle to impress the lines onto the clay surface.
3. Trim excess clay
Cut around the outside of the template with a tissue blade and remove the waste clay from around the frame. The frame will not be removed from the tile until after baking to avoid distorting it.
4. Cut corners neatly
Cut out the frame opening using your knife. To cut the corners neatly, first position the point of your knife precisely on the corner and cut by drawing your knife along the line away from the corner, stopping before you reach the opposite corner.
5. Repeat
Repeat to make a cut from the same corner along the other cutting line. Cut all the corners in this way, always cutting from a corner outward.
6. Remove clay
Remove the rectangle of waste clay from the inside of the frame opening by digging into it with your knife and then lifting it way. Be careful not to damage the edges of the frame opening as you do this.
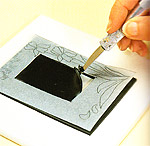
7. Decorate the frame front
Remove the tracing and use the blunt point of a tapestry needle to scribe along the lines of the design to make them clearer. Use the point to mark textural lines on the petals and leaves, using the template as a guide. These lines will show through the transparent could enamel and add texture to the design.
8. Create a thin clay thread
Roll out a thin thread of clay to use for the cloisonné outline. The thread should be about 1/32" (1mm) thick.
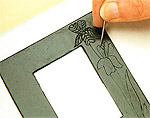
9. Apply the clay thread
Holding the thread by its handle of thicker clay, lay it along one of the lines of the design. Use your knife to push the thread into position and trim it to length. The clay handle saves you from touching the fine thread with warm hands and distorting it. Roll out more threads of clay and apply to all the outline lines of the design in the same way.
10. Press down the clay threads
Press the threads down lightly with your finger. Each petal or leaf must be completely enclosed with a thread of clay so that when the colored enamel is applied, it cannot flow out. The threads also need to be in contact with the clay surface of the frame all along their lengths or the enamel may seep underneath them.
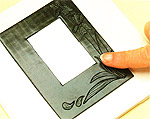
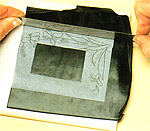
11. Brush with silver powder
Brush the frame with silver powder so that the black clay is completely covered. Try not to lift any of the threads as you brush. If any do lift up, gently push them back into place. After baking, they will be consolidated by the coat of varnish.
12. Cut out the frame back
Roll out another sheet of clay on a second tile and cut out the frame back in the same way as the frame front. Cut out around the central opening, but leave the clay in place until after the frame back is baked. This central section will become the removable part of the frame back that allows you to insert or change the photograph. Bake the frame front and back on their respective tiles for 30 to 40 minutes.
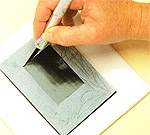
13. Varnish
When the frame front has cooled, varnish the whole front to seal the silver powder. Be sure that you do not miss any parts of the design because loose powder will float to the top of the epoxy enamel when it is applied and spoil the transparency.

14. Mix epoxy
Using gloves for hand protection, mix the epoxy according to the manufacturer's instructions. This is usually equal parts of epoxy and hardener or in the ratio of 1 part hardener to 2 parts epoxy. Stir thoroughly and set aside for a few minutes to allow the air bubbles to disperse.

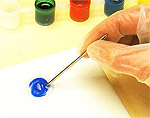
15. Tint epoxy
Pour about half a teaspoonful of the epoxy enamel mixture onto a tile. Use the tapestry needle to mix in a little transparent blue color and stir thoroughly. The color should be fairly strong but should not lose its transparency. The color should be fairly strong but should not lose its transparency. It will set without any color change.
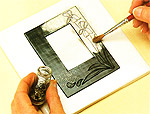
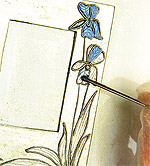
16. Apply epoxy to frame
Use the tapestry needle to drop pools of blue epoxy enamel into each iris petal cell. The layer should be thick enough to reach almost to the top of the clay thread surrounding the petal shape. Push the enamel into the corners with the point of your needle.
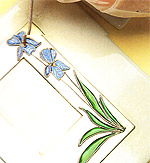
17. Cure overnight
Repeat for all the other shapes, dropping green enamel into the leaves and a touch of orange into the iris centers. Place the completed frame front on a level surface, cover with an upturned shoebox to protect it from dust and leave overnight to cure.
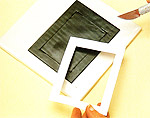
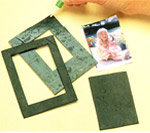
18. Assemble the frame
Glue the frame front to the frame back with superglue, matching the outside edges all around. Cut your chosen photograph so that it is slightly smaller than the frame back insert. If you want to use acetate sheet as glass, cut this to the same size.
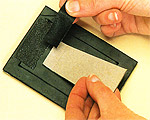
19. Attach the frame back
Lay the acetate (if used), then the photograph into the rebate in the back of the frame. Push on the frame back insert and tape the joins with black carpet tape. This means that you can change the photograph if you wish.

20. Create frame stand
Trace the frame stand onto thick cardstock and cut out using a metal rule and a heavy-duly craft knife. Score along the dotted line and turn the stand over so the scoring is toward the frame. Tape the top of the stand to the frame back, 1¼" (3cm) from the top of the frame. Bend the stand outward to prop the frame.
 Friendship Day
 Good Morning