Butterfly Pins
Materials Needed :
Yellow Felt
Black hair pin
Blue Felt
Pin or magnet strips
Pink Felt
Hot Glue Gun
Pattern for wings
Tacky Glue
½ inch black pom-poms 3 per butterfly
Note: You can use any color of felt you want, just make
sure you use 3 different colors per butterfly.
Butterfly Pattern to print
Directions:
For each butterfly do the following:
- Cut one base wing out of yellow felt
- Cut one center wing out of blue felt
- Cut one top wing out of pink felt
- Use a craft stick to spread a thin layer of glue on the outside edge of
the yellow base wing felt.
- Place blue center wing felt on top of yellow and press together.
- Spread some glue in the center of the butterfly's body.
- Press the hair pin into place.
- Take the pink top wing section and press into the middle of the
butterfly on top of the hair pin. Only press into the glue a very small
part of the pink wing.
- Spread some glue on 3 pom-poms and press into middle of butterfly.
- Bend pink wings up against pom-poms.
- Let dry.
- When dry you can either glue on a magnet strip or a pin.
- You can use any color felt you want. See our examples below. (this
picture is not very good - better ones will be posted later, at least
you get the idea - you can't see the bright colors). We used neon green
and neon pink and bright purple for the top wings in the example. You
can use either pastel or bright colors.
Cinnamon Ornaments
Materials Needed :
1 cup cinnamon
1 teaspoon allspice
1 teaspoon cloves
1 teaspoon nutmeg
1 cup applesauce
cookie cutters
ribbon for hangers
nail to make hole
Directions:
- Mix dry ingredients together.
- Add applesauce and mix until it's the consistency of play dough (may need
to add more cinnamon or applesauce).
- Roll out to about a ¼ inch thickness on a surface coated with
cinnamon. Cut out desired shape with cookie cutter.
- Poke a hole in top of ornament for some type of hanger when dry (We used
the real small width ribbon for hangers).
- Place on cookie sheets and air dry 4 - 5 days. Turn the ornaments over
once or twice a day so that they dry evenly.
- If you want you can paint on them when they are dry (We didn't but you
could).
Note: I found another recipe that says to bake the
ornaments at 150 degrees for 1 hour and then turn the oven off and leave
them in for another 2 to 3 hours. You might want to try that instead of
letting them air dry.
I always double the batch. You can find cinnamon in bulk at warehouse
type stores (then it's not so expensive - Sams club or Cub foods is
where I find it). We made stars, hearts, bells, teddy bears, and trees.
Build a Birdhouse on Friendship Day
Try your hand on building a bird house and gift it to your feather
loving friend. The pleasure of having a bird in your premise, without
caging it is enormous. If you too, want to be friends with birds, you
can build a bird house, and gift it to your feathered friends, by
hanging it somewhere safe.
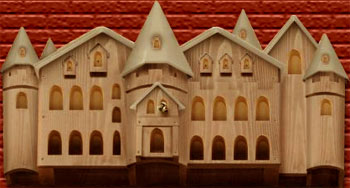
You can either go for some of the established designs, or just modify a
wooden letter box, to turn it into a bird house.
A few basic things of a bird house are:
- Wood is the favored material. Pressed boards and metals are a strict
no no.
- There should be enough (small) ventilation holes everywhere except
the roof. Some drainage holes should be provided at the floor.
- The roof should be well extended, shading the entrance hole by at
least 3 inches, acting as a sun shed and not letting rainwater in as
well.
- It should be well protected and out of reach of predators like cats
and pests as well. Special lookout should be maintained to see that ants
are not forming a line to the house. If required, ant killing pesticide
should be applied.
- Placement should be done with thought. The opening should face away
from the prevailing wind, the houses should be situated in partial
sunlight. Subdued color tones are best, except for those placed in
direct sunlight where white is needed to reflect the heat.
- Don't place the houses too close together, as birds needs
territories. 1 in ¼ of an acre is good.
- Keep a strict, but non-obtrusive watch on the bird house, and keep a
water source nearby.
- The size of hole that you make in your bird house and its height above
ground will determine, in part, what kind of bird your bird house attracts.
Bird houses can be of different shapes and sizes, depending on your
imagination. The easiest way is to convert a wooden letter box. You will
need to extend its roof to shed water, and make a round hole towards the
top, and the ventilation and drainage holes.
For those who want to make it from scratch, first make a plan of it on a
paper, and then proceed with your design.
A typical checklist may be:
- hammer and ½" finishing nails
- waterproof glue
- sandpaper
And a typical work procedure may be :
- drill with 1-3/8" hole saw and ¼" drill bit
- ½" plywood in sizes you have decided, (5.5 inches to 6 inches square is
standard), for two bottom sides and two inside supports
- ¼" plywood for two roof sections, each around 7inces by 6 inches.
- ¼" plywood for the front and back sections.
- 5" length of dowel to finish the top, and 3" length of dowel for bird
perch
- optional: paint or stain
Instructions:
Assembly Instructions:
- Before proceeding with each joint, start the nails, tapping into
position, then apply waterproof glue along the joint edge.
- Butt and glue the two bottom sides together.
- Next, glue and nail the back section to the bottom sides.
- Glue and nail the inside supports.
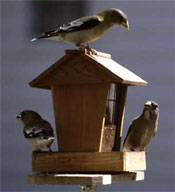
- Using the 1 3/8 hole saw, drill a hole in the front section so that
the top of the hole is 2" down from a corner; see finished photo for
detail. Use a ¼" bit to drill a hole for the dowel perch, 5'8" below
the bottom of the larger entrance hole. Sand the edges smooth, and sand
all other inner parts of the bird house before nailing down the front.
- Glue and nail the front to the bottom sides and the inside supports.
- Position roof sections so that they meet, but do not butt at the top.
Glue and nail the roof sections into place. The roof overhangs the
sides, as shown.
- Glue the 5" dowel in the channel between the roof sections to
complete this joint.
- Sand all surfaces.
- Lastly, glue the 3" dowel into position as a perch.
Your bird house is now ready to stain or paint as desired.
Mini Bags for envelops
Instructions:
- Take the envelope and seal it (like normal).
- Cut off one end of the envelope (this is the side of the normal
envelope). The top and bottom of the envelope become the sides of the
bag - the sides of the envelope become the bottom and opening.
- Decorate the flat envelope however you want. The cut off end will be the
top of the bag, so make sure designs are right side up.
- We used stamps and ink pads to decorate our bags. We had multi colored
ink pads and made random designs on the bags. Girls do tend to press
down to hard on ink pads, so you need to supervise this process closely.
- Let the envelopes dry for a few minutes if you used ink pads and stamps.
- Fold each side of the envelope (envelope to & bottom) in about ¼ to
½ inch or so and crease well. It needs to be creased well or it will
be hard to form the bag.
- Fold the bottom of the envelope (envelope side) in about ½ inch or so
and crease well.
- Now open envelope to create the bag - creased sides allow the envelope
to open like a bag and creased bottom give it a flat bottom. You may
need to crease the sides and bottom a little more as you open the bag.
- There will be two little triangular pieces left from the side folds on
the bottom. Tape or glue these pieces to the bottom of the bag.
- Use a scissors to make a small hole in each side of the bag near the
top. (this will be for the handle)
- Insert curling ribbon into hole and tie a knot. Repeat for other side.
- Decorate tissue paper the same way you did the bags and place in bag for
a fancy effect.
- Put the treats or small prize into the bag. Give to someone special.
Weave a friendship bracelet
Instructions:
Rating:
Made with 5 different colors(60" of 4, 78" of 1) arranged:
1L, 2L, 3L, 4L, 5L, 1R, 2R, 3R, 4R, 5R.
Threads should be prepared in the usual way folded in half.
Fk == forward knot.
- Starting at right, make fk (forward knot) with 4R around 5R.
- 2 fk with 3R around 5R and 4R.
- 3 fk with 2R around 5R, 4R and 3R.
- 4 fk with 1R around 5R, 4R, 3R and 2R.
- 5 fk with 5L around 5R, 4R, 3R , 2R and 1R.
- 6 fk with 4L around 5R, 4R, 3R , 2R, 1R and 5L.
- 7 fk with 3L around 5R, 4R, 3R ,2R, 1R, 5L and 4L.
- 8 fk with 2L around 5R, 4R, 3R ,2R, 1R, 5L ,4L and 3L.
- 9 fk with 1L around 5R, 4R, 3R ,2R, 1R, 5L ,4L ,3L and 2L.
The threads are now in the opposite position to which they were at the
beginning.
- Continue the first 9 steps from the left side of the pattern, this
time using bk (backward knots) instead of fk (forward knots).
 Friendship Day
 Good Morning