 Materials Needed :
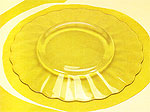
- 15" (38cm) scalloped platter
- liquid laminate
- paper glaze
- scissors
- 2" (5cm) circle template
- 1" (3cm) circle template or Shape-cutter and Curcles-1 template
- cutting mat
- pencil
- ¾" (19mm) wash brush
- plastic cups
Paper Palette:
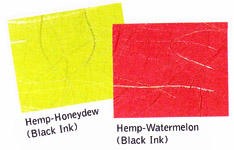
About the papers:
These papers are made in Japan and have strands of manila hemp scattered over the surface of the paper. The hemp catches the light and makes the paper look like it has silk threads in it. Notice that the fibers are only on one side of the paper. I love the combination of these two colors.
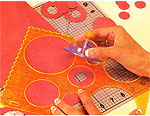
1. Cut Out the Circles
Use the Shape-cutter and the Circles-1 template to cut out the following shapes from the water-melon paper. Cut out thirteen 2" (5cm) circles. Cut out eleven 1" (3cm) circles, spacing them at least 3" (8cm) apart n the large sheet of paper. Cut out six donut shapes by placing the 2" (5cm) template over the top of a 1" (3cm) hole that was left in the large sheet of paper.
2. Trace the Plate
Turn the honeydew paper face down and set the plate face down on top of it. Trace the perimeter of the plate with a pencil, then measure out about 1" (3cm) from that line and cut out the circle, using scissors.
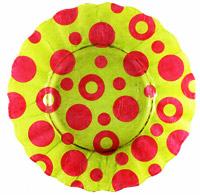
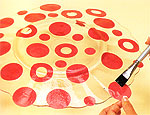
3. Adhere the Circles
Turn the plate upside down on top of a plastic cup. Use the wash brush to cover the back of the plate with liquid laminate. Arrange the circles in a random pattern on the back of the plate. Be sure to place the circles hemp side down so the fibers can be seen from the front of the plate. Place some of the circles so they extend over the edge of the plate. Brush liquid laminate on the back of each circle pieces that hand over the edge of the plate.
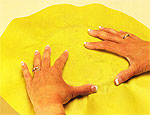
4. Add the Honeydew Paper
Apply a generous coat of liquid laminate over the entire surface of the back of the plate. Place the honeydew paper face down on the back of the plate. Apply laminate to the paper and press the paper firmly to the glass. Begin to smooth and mold the paper to the plate starting in the center and working your way toward the outside edges.
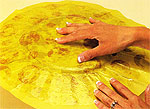
5. Continue Molding the Paper
Brush more laminate over the back of the paper to keep it pliable. Use your fingers to mold the paper into the scalloped areas of the plate. Don't worry if you have a few wrinkles in the paper. Smooth them the best you can and the remaining wrinkles are called "handmade nuances," and will barely be seen on the front of the plate.
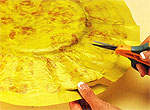
6. Trim the Excess Paper
Trim the excess paper off the edges of the plate with scissors. Press the edges of the paper firmly to the glass. Let the laminate dry. Apply a coat of paper glaze to finish the back of the plate. Apply one or two additional coats of glaze if you will be using the plate as a serving platter.
 Friendship Day
 Good Morning