Materials Needed :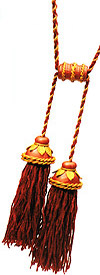
- 2-ounce (60g) blocks of polymer clay: 1 copper and 1 gold, plus scrap clay for the formers
- foil
- teaspoon
- knitting needle
- artist's paintbrush handle or similar tool for grooving
- yarn for the tassel skirt
- matching cord, about 1/8" (3mm) thick
- tacky glue
- stiff cardstock for making the tassel skirts
- scissors
- paperclip
- roller
- craft knife
- tile (optional)
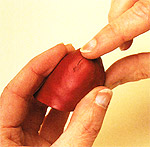
1. Make the tassel formers
Form a 1½" (4cm) ball of scrap clay and roll it between your hands to make an oval about 1¼" (3cm) diameter and 2" (5cm) long. Bake the oval for 30 minutes. Allow it to cool until you can handle it but it is still warm. With a sharp blade, cut neatly through the "equator" of the oval to give two identical formers. (Clay is much easier to cut when it is still warm.)

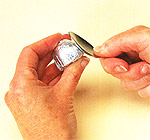
2. Wrap formers in foil
Wrap each former tightly in foil, folding the edges of the foil onto the flat end of the former and trimming away any excess foil.
3. Smooth the surface
Use the back of a teaspoon to press the foil firmly onto the former and smooth out any wrinkles. A smooth surface will make it easier to remove the former from the clay after baking.
4. Make the tassel cups
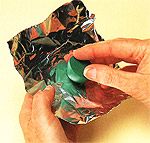
Roll out a sheet of copper clay, about 1/16" (1.5cm) thick, rolling and folding it several times so that the sheen on the surface is smooth and continuous. Cut out a rough shape, about 6" (15cm) square, and warp this around the domed part of one of the formers. Trim the clay to size so that the ends meet neatly and butt together.

5. Cut notches
Cut V-notches out of the clay at the top of the former's dome so that the sheet can be pressed flat and dovetailed together rather like fitting orange peel back onto an orange.
6. Rejoin and smooth
Press the clay down, trimming further if necessary. Smooth the joins with the tip of your finger, smearing the surface of the clay slightly to make a continuous shiny surface.
7. Trim excess clay
Trim away the excess clay around the base of the former with scissors and neaten the bottom edge. Take care that the clay does not curve around onto the bottom of the former, or the tassel cup will be difficult to remove from the former after backing. Repeat steps 4 to 7 to cover the second former.
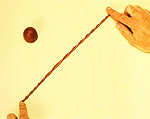
8. Decorate the tassel cups
Form a long, thin log of gold clay, about 1/8" (3mm) thick and 12" (30cm) long. Cut this in half and lay the two pieces together. Now twist the lengths into a rope by twisting the right-hand end away from you and the left-hand toward you. Coax the clay to twist all along the length, keeping the twists as even as possible.
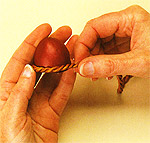
9. Add the first rope
Wrap the rope around the base of the tassel cup, pressing it onto the3 edge of the copper clay so that it is attached all around.
10. Add the second rope
Wrap a second rope around just above the first. For each rope, trim the ends where they meet and butt the two ends together neatly.
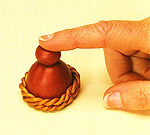
11. Add the ball
Form a 5/8" (15mm) ball of copper clay and press this onto the top of the tassel. It will flatten slightly as you press to make an attractive finial.
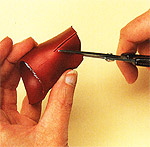
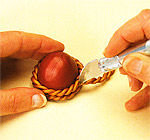
12. Pierce the ball
Use the knitting needle to pierce a hole right through the ball and the clay sheet covering of the former. Rotate the needle to enlarge the hole, which needs to be 3/16" (5mm) wide, or at least wide enough for your chosen cord to pass through.
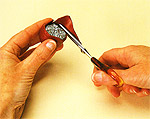
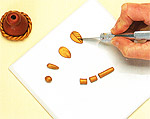
13. Make the leaves
Form a ¼" (6mm) thick log of gold clay and cut six ¼" (6mm) lengths. Roll these into balls and shape each into a teardrop. Press each teardrop down onto a tile so that it thins and forms a leaf shape. Use your knife to mark veins.
14. Add the leaves
Slide your knife blade under each leaf to lift it off the tile, and press the leaves around the top of the tassel cup, just below the ball. Space them evenly and give each a little twist to make it look more natural.
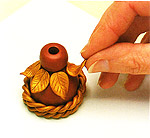
15. Add a thin log
Form a thin log of gold clay, about 1/16" (1.5mm) thick, and warp this around the tassel between the leaves and the ball finial. Repeat steps 8 to 15 for the second cup.
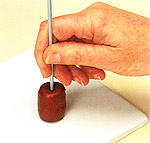
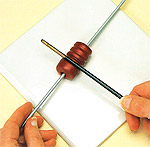
16. Make the tube bead
Form a 1¼" (3cm) ball of copper clay and roll it on the tile to shape it into a cylinder, 1½" (4cm) long and about 7/8" (22cm) wide. Stand it on one end, and use the knitting needle to pierce down through the bead, then push the bead right onto the needle.
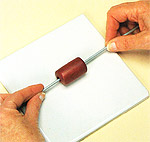
17. Enlarge hole
Now grasp the needle in your hands, one on either side of the bead, and roll the bead back and forth on the tile. This will enlarge the hole and smooth the sides of the bead. The hole needs to be about ¼" (6mm) wide, or wide enough for three thicknesses of your cord to fit through fairly tightly.
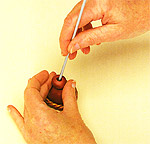
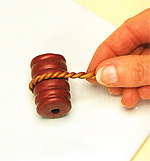
18. Groove the clay
With the bead still on the knitting needle, hold a paintbrush handle across the bead and, pressing down lightly, roll the bead back and forth on the tile so that the handle "grooves" the clay. Repeat to make five evenly spaced grooves.
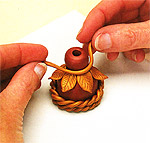
19. Add ropes
Make some more gold clay rope as in step 8, and warp lengths around the center and the two end grooves on the bead.
Bake the bead with the tassel cups for at least 30 minutes. Allow to cool, then ease the tassel cups off the formers. You may find this easier to do if you open out the foil at the base of each former so that you can ease the former out of the foil first, then pull the foil out of the cup.
20. Make the tassel skirt
Cut a piece of stiff card into a 6" (15cm) square. Wind the yarn around this until you have a good thick hank for the tassel skirt.
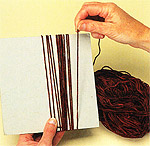
21. Cut off hank
Cut through the yarn along the bottom edge with sharp scissors - this releases the yarn from the card and gives you a hank of 12" (30cm) lengths of yarn. Repeat for the second tassel skirt.

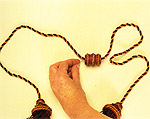
22. Add cord
Cut a length of cord that is long enough to go round your curtain twice and add an extra 18" (45cm). If the cord starts to fray, glue the ends together with a little tacky glue. Bend a paperclip into a hook and use this to pull one end of the cord through one of the tassel cups.

23. Tie together
Spread out flat one of the hanks of yarn and lay the end of the cord along the center. Use a piece of yarn to tie a tight knot around the halfway point of the hank, trapping the end of the cord. As you tighten the knot, the yarn will gather together into the tassel skirt.
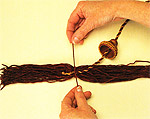
24. Add tassel cup
Hold the tassel by the cord and pull the yarn down over and around the knot. Arrange the yarn so that the cord emerges from the center of the3 gathered yarn. Pull the other end of the cord to draw the tassel into the tassel cup.

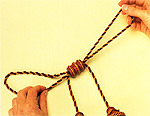
25. Assemble the tieback
Thread the second end of the cord through the tube bead and then through the second tassel cup. Attach the second tassel skirt in the same way as the first. Lay the tassels out in front of you and push the paperclip hook through the tube bead. Catch a loop of cord from about halfway along and pull it through the tube bead. This almost magically gives you the two loops for the tieback and leaves the two tassels dangling by their cords.
26. Create loops
Pull the loops through the tube bead to make them the same length and arrange the tassels to hang one just above the other. Hang one loop over the hook on your wall behind the curtain, pass the tieback around the front of the curtain and hang the other loop over the same hook. Make another tieback in the same way for a matching pair of curtains.
 Friendship Day
 Good Morning