Materials Needed :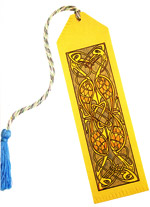
- 2-ounce (60g) blocks of polymer clay: 1 beige (Premo! Ecru)
- pasta machine or roller and wood strips
- tissue blade or long straight knife blade
- fresh photocopy or laser print of the template provided scissors
- coloring pencils: red, blue, yellow, green orange
- large tapestry needle
- 1/8" (3mm) wide brush protector or round cutter
- yellow embroidery silk
- small piece of stiff cardstock - business card size is ideal
- 12" (30cm) thin blue silk cord
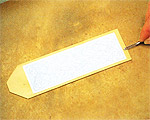
Click here for the Bookmark pattern in full size
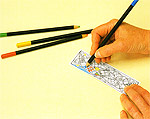
1. Prepare the photocopy
Trim the photocopy close to the outline all around. Color the image with the coloring pencils, pressing firmly so that the color is strongly applied.
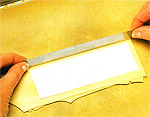
2. Make the bookmark
Roll out some beige clay, about 1/16" (1.5mm) thick, and lay it into a baking sheet lined with baking parchment. Place the image face down onto the clay, and use your blade to trim the bottom and sides of the bookmark, leaving a border of about 1/8" (3mm) down each side and 1/4" (6mm) at the bottom. Remove the waste clay from around the bookmark, and do not move the bookmark until after baking.
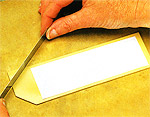
3. Trim the corners
Trim the top corners of the bookmark at an angle, leaving about ½" (13mm) of straight top edge in the center. If you find this hard to do by eyeballing it, cut out the shape in paper first to use as a guide to cut around.
4. Decorate the bottom
Mark along the bottom of the bookmark with the eye of a large tapestry needle to suggest tooled leather.
5. Cut the tassel hole
Use the brush protector to cut a neat hole in the top of the bookmark for the cord and tassel.
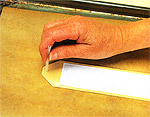
6. Press on image and bake
Burnish all over the back of the image with the pad of your finger. Work from the center outward so that you squeeze out any air bubbles. The pressure should be firm, but do not squash the clay. Bake for 20 minutes with the photocopy still in place.
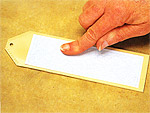
7. Remove image
When the clay is cool enough to handle, peel back the paper. The black lines of the photocopy and the coloring pencil will have transferred permanently onto the clay surface.

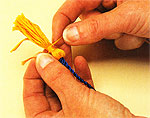
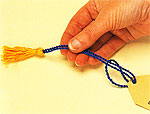
8. Make the tassel
Make a small tassel by winding yellow embroidery silk around a business card and cutting to form a hank for the tassel skirt in the same way as for the large tassels on
step 20 of Tassel Tiebacks. Attach the cord to the skirt in the same way (
step 23), but first double the cord and bind the free ends together into the skirt so that the tassel hangs from a loop. Bind around the tassel with yellow silk, about ¼" (6mm) below where the cord emerges.
9. Attach the tassel
Push the doubled end of the cord through the hole in the top of the bookmark and pull the tassel through the loop to secure.
 Friendship Day
 Good Morning